Not only can I help in Central Florida and the Ocala area- but also in Palm Beach areas as well-
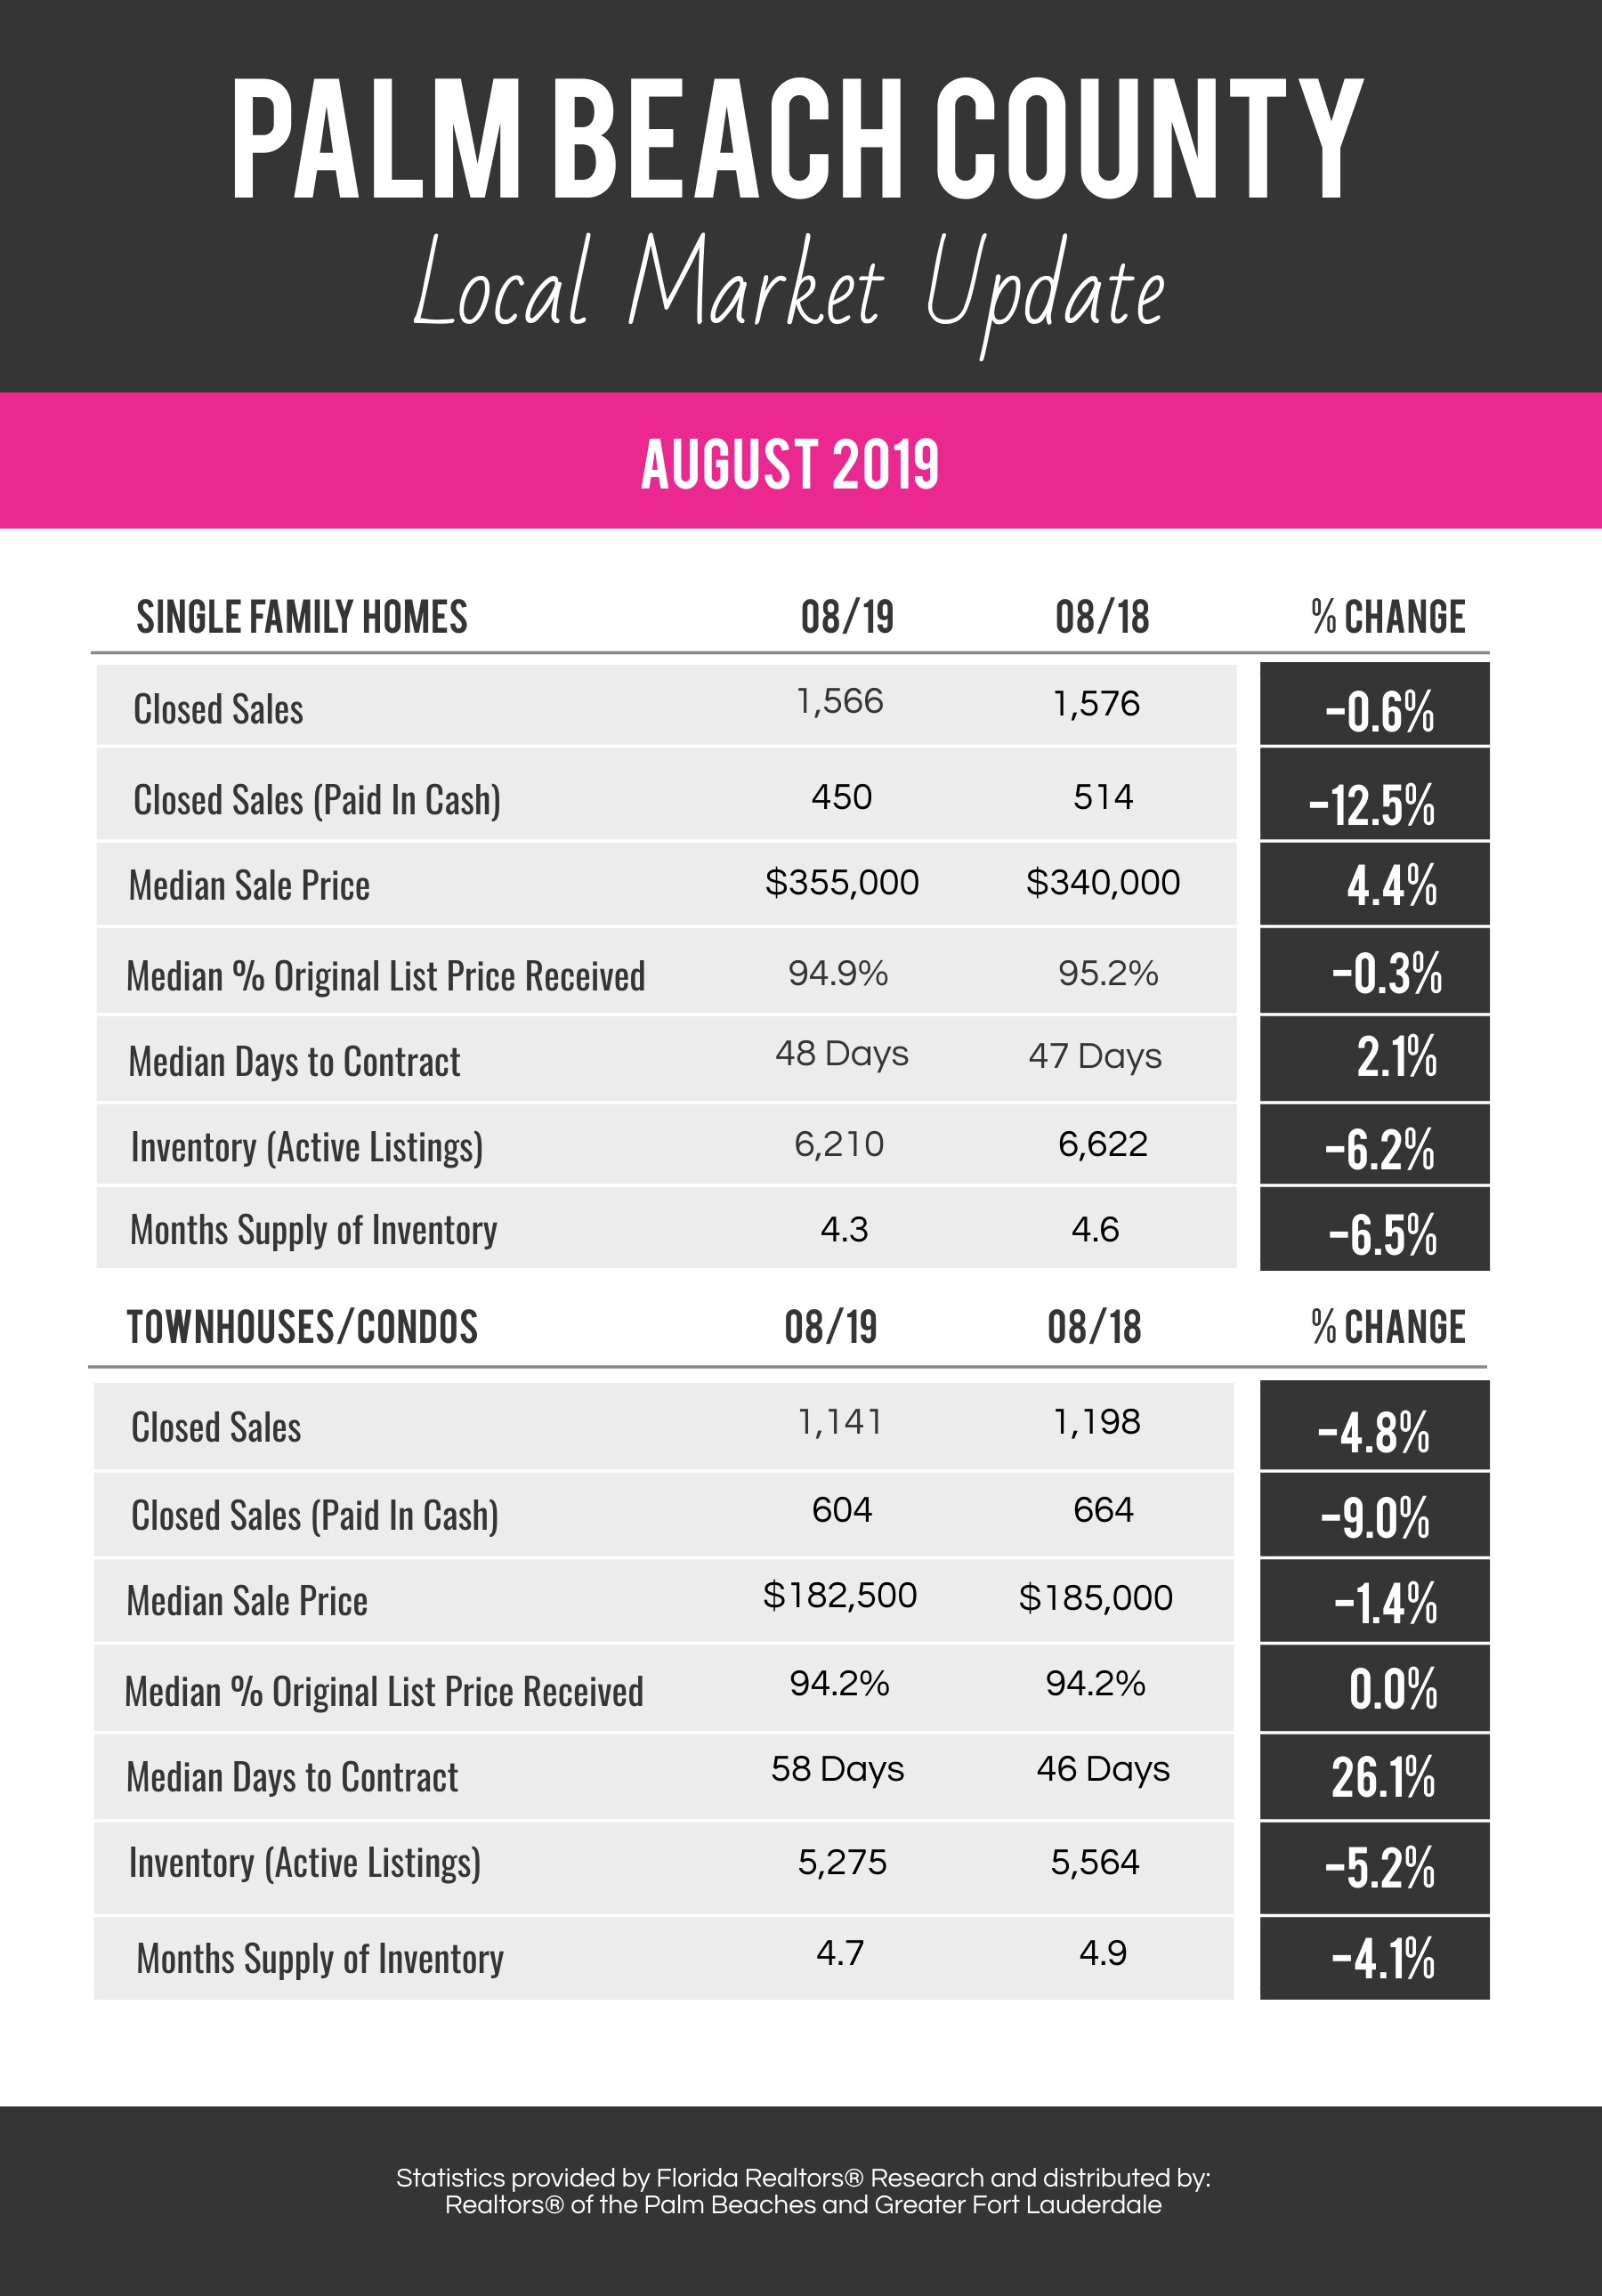 |
1,207 total views, 3 views today

It’s easy to get swept up in the excitement of buying a home. Once you’ve had an offer accepted on your dream house, you’ll probably be anxious to move in. However, before you make a significant financial commitment, it’s best to know exactly what you’re buying.
When you hire a home inspector, you get a professional, in-depth examination of the property’s structures and systems. It’s a worthwhile investment that can save you money in the long run, either by warning you away from a bad purchase or by providing a list of deficiencies you can use to negotiate with the sellers.
The inspector’s report will also list minor repairs that, if made, will help to maintain your home over the long term. Additionally, a good inspector can often predict the standard life expectancy of your roof, HVAC, and other big-ticket items so you can start planning for their eventual replacement.
However, many buyers make mistakes during the inspection process that cost them time and money and lead to unnecessary stress. Avoid these eight common buyer blunders to minimize your risk, protect your investment, and give yourself peace of mind and confidence in your new home purchase.
MISTAKE 1: Skip Your Own Inspection
Many buyers rely on their home inspector to point out issues with the property. However, by conducting your own visual assessment before you submit an offer, you can factor expected expenses into the offer price. Or, if you suspect major problems, you may choose to move on to a different property altogether.
Examine the walls and ceilings. Are there suspicious cracks, which could point to a foundation issue? Any discoloration? Yellow spots can indicate water damage, while black spots are typically mold. If there’s a basement, look for powdery white deposits along the walls and slab, which can result from water seepage.1
To assess the plumbing, start by turning on a bathroom sink or tub, then flushing the toilet. Check for a drop in water pressure or a gurgling sound coming from the pipes. You can also try running the water in sinks and tubs for several minutes to test for drainage issues. Peak underneath sinks to spot signs of leaks or drain pipes that go into the floor instead of the wall.1
Look for fogged or drafty windows, which may need replacing. Examine the roof for signs of cupped, curled, or cracked shingles. Check siding, decks, and other wooden structures for evidence of rot.
Overall, does the home appear to be well maintained? Unless it’s a highly-competitive seller’s market, consider the overall condition of the property BEFORE you submit an offer. Work with your real estate agent to factor in repairs and updates you know you’ll need to make when you determine your offer price.
MISTAKE 2: Hire the Cheapest Inspector
We all love to save money, but not all inspectors are created equal. Before you hire one, do a little research.2 You may even want to start shopping for an inspector before you complete your home search. Inspection periods are typically short, so it never hurts to be prepared.
You can start by asking around for recommendations. Check with friends and family members, as well as your real estate agent. Then contact at least two or three inspectors so you can compare not only price but also levels of experience and service.
Ask about their background, years of experience, and the number of inspections they have completed. Verify their certifications and credentials, and make sure they carry the proper insurance.
Find out what is (and what isn’t) covered in the inspection and if they utilize the latest technology. Ask to see a sample report so you can compare the style and level of detail provided. Finally, make sure you feel confident in the inspector’s abilities and comfortable asking him/her questions.
MISTAKE 3: Miss Attending the Inspection
Make every effort to be on-site during the inspection. Buyers who aren’t present during their inspection miss out on a great opportunity to gather valuable information about their new home.
If can attend the inspection, don’t spend all your time picking out paint colors or chatting with your new neighbors. Instead, use your time there to shadow the inspector. It’s the perfect chance to find out where everything is located, ask questions, and see first-hand what repairs and updates may be needed.3
Of course, if you do choose to tag along with your inspector, exercise good judgment. Don’t get in the way, become a distraction, or do anything to jeopardize your (or the inspector’s) safety.
If you can’t make it to the inspection, ask if you can schedule a time to meet in person or speak by phone to go over the report in detail. It will give you an opportunity to ask questions or request clarification about issues in the report you don’t fully understand.
MISTAKE 4: Skim Over the Report
Inspection reports can be long and tedious, and it can be tempting to skim over them. However, buyers who do this risk missing crucial information.
Instead, you should read over the report carefully, so you don’t miss anything significant. Now is the time to address any areas of concern. You have a limited window of time to request repairs or negotiate the selling price, so don’t squander it.
Your inspector may also flag some minor items that you wouldn’t typically expect a seller to fix. However, ignoring these small issues can sometimes lead to bigger problems down the road. Make sure you read everything in the report so you can take future action if needed.
MISTAKE 5: Avoid Asking Questions
Some buyers are too embarrassed to ask questions when there’s something in the inspection report they don’t understand. Afraid they might look foolish, they avoid asking questions and end up uninformed about important issues that could impact their home purchase.
The reality is, questions are expected. You hired your inspector for their professional expertise, so don’t be shy about tapping into it. For example, you might ask:
● Would you get this issue fixed in your own home?
● How urgent is it?
● What could happen if I don’t fix it?
● Is this a simple issue I could fix myself?
● What type of professional should I call?
● Can you estimate how much it would cost to make this repair?
● How much longer would you expect this system/structure/appliance to last?
● What maintenance steps would you recommend?
Don’t bother asking your inspector if you should buy the property, because he/she won’t be able to answer that question for you. Instead, use the information provided to make an informed decision. A skilled real estate agent can help you determine the best path.
MISTAKE 6: Expect a Perfect Report
Some buyers get scared off by a lengthy inspection report. But with around 1600 items on an inspector’s checklist, you shouldn’t be surprised if yours uncover a large number of deficiencies.4 The key is to understand which problems require simple fixes, and which ones will require extensive (and costly) repairs.
Your real estate agent can help you decide if and how to approach the sellers about making repairs or reducing the price. Whatever you do, try to focus on the major issues identified in the inspector’s report, and don’t expect the sellers to address every minor item on the list. They will be more receptive if they perceive your requests to be reasonable.
MISTAKE 7: Forgo Additional Testing
There are times when an agent or inspector will recommend bringing in a specialist to evaluate a potential issue.5 For example, they may suggest testing for mold or consulting with a roofing expert.
Some buyers get spooked by the possibility of a “red flag” and decide to jump ship. Or, in their haste to close or desire to save money, they choose to ignore the recommendation for additional testing altogether.
Don’t make these potentially costly mistakes. In some cases, the specialist will offer a free evaluation that takes minimal time to schedule. And if not, the small investment you make could provide you with peace of mind or save you a fortune in future repairs.
MISTAKE 8: Skip Re-inspection of Repairs
Most buyers request receipts to prove that repairs have been correctly completed. However, it’s always prudent to go a step further and have negotiated repairs re-evaluated by your inspector or another qualified professional, even if there’s an additional charge.6
While the majority of sellers are forthcoming, some will try to save money by cutting corners, hiring unlicensed technicians, or doing the work themselves. A re-inspection will help ensure the repairs are completed properly now, so you aren’t paying to redo them later.
To avoid having to go back to the sellers, be specific when requesting repairs. Identify the problem, how repairs should be completed, who should complete the work, and how the repairs will be verified.7
Some buyers prefer to avoid this step altogether by completing the work themselves. They either request that the seller fund the repairs or reduce the selling price accordingly. Whichever path you choose, protect yourself and your investment by ensuring the work is done properly.
WE CAN HELP
A home inspection can reduce your risk and save you money over the long-term. But to maximize its effectiveness, it must be done properly. Avoid these eight common home inspection mistakes to safeguard your investment.
While these are some of the most common missteps, there are countless others that can trip up home buyers, cost them time and money, and cause undue stress. Fortunately, we have the skills and experience to help you avoid the potential pitfalls.
If you’re in the market to buy a home, we can help you navigate the inspection and all the other steps in the buying process … typically at no cost to you! Tap into our expertise to make the right decisions for your real estate purchase. Contact us today to schedule a free consultation!
Sources:
1. Family Handyman –
https://www.familyhandyman.com/tools/diy-home-inspection-tools/view-all/
2. HGTV –
https://www.hgtv.com/design/real-estate/finding-the-right-home-inspector
3. The New York Times –
https://www.nytimes.com/2018/03/23/realestate/home-inspection.html
4. Realtor.com –
https://www.realtor.com/advice/buy/what-does-a-home-inspector-look-for/
5. Realty Times –
https://realtytimes.com/advicefromagents/item/37369-top-5-biggest-home-inspection-mistakes
6. Realtor.com –
https://www.realtor.com/advice/buy/home-inspection-mistakes-buyers-should-avoid/
7. Star Tribune –
http://www.startribune.com/who-verifies-repairs-after-the-home-inspection/132844523/
5,376 total views, 3 views today

Whatever your reasons are for relocating to a new area, the process can feel overwhelming.
Whether you’re moving across across town or across the country, you’ll be changing more than your address. Besides a new house, you may also be searching for new jobs, schools, doctors, restaurants, stores, service providers and more.
Of course you’ll need to pack, make moving arrangements, and possibly sell your old home. With so much to do, you may be wondering: Where do I start?
In this guide, we outline seven steps to help you get prepared, get organized, and get settled in your new community. Our hope is to alleviate the hassle of relocating—so you can focus on the exciting adventure ahead!
1. Gather Information
If you’re unfamiliar with your new area, start by doing some research.1 Look for data on average housing prices, demographics, school rankings and crime statistics. Search for maps that illustrate local geography, landmarks, public transportation routes and major interstates. If you’re moving across the country, research climate and seasonal weather patterns.
Check out local newspapers and blogs for information on political issues and developments that could impact your new community. You may also want to search for online forums and Facebook Groups relevant to your new area. These can be a great place to find information, ask questions and just observe local attitudes and outlooks.
If you’re relocating for a job, find out if your new employer offers any relocation assistance. Many large corporations have a designated human resources professional to assist employees with relocation efforts, while others may contract this service out to a third party. Some employers will also cover all or a portion of your relocation and moving costs.
By gathering this information up front, you’ll be better prepared to make informed decisions down the road.
Let us know if you’d like assistance with your information gathering process. We have a wealth of knowledge about this area, and we keep a number of reports and statistics on file in our office. We would be happy to share information and answer any questions you may have.
2. Identify Your Ideal Neighborhoods
Once you’ve sufficiently researched your new area, you can start to identify your ideal neighborhoods.
The first step is to prioritize your “needs” and “wants.” Consider factors such as budget; commute time; quality of schools; crime rate; walkability; access to public transportation; proximity to restaurants, shopping, and place of worship; and neighborhood vibe.
If possible, visit the area in person to get a feel for the community. If you’re comfortable, strike up conversations with local residents and ask about their experiences living in the area.
Still not sure which neighborhood is the best fit for you and your family? Contact a local real estate agent for expert assistance. It’s usually the most efficient and effective way to narrow down your options.
We provide neighborhood assessments and advice as a free service if you’re relocating to our area. Or, if you’re moving out of town, we can refer you to a local agent who can help.
3. Find Your New Home (and Sell Your Old One)
Once you’ve narrowed down your list of preferred neighborhoods, it’s time to start looking for a home. If you haven’t already contacted a real estate agent, now is the time. They can search for current property listings that meet your needs, typically at no cost to you.
Create another list of “needs” and “wants,” but this time for your new home. Include your basic requirements for square footage, bedrooms and bathrooms, but also think about what other factors are important to you and your family. An updated kitchen? A large backyard? Double sinks in the master bathroom?
Narrow your list down to your top 10 and prioritize them in order of importance.2 This will give you a good starting point to begin your home search. Unless you have an unlimited budget, don’t expect to find a home with everything on your list. But having a prioritized list can help you (and your agent) understand which home features are the most important, and which ones you may be willing to sacrifice.
If you already own a home, you’ll also need to start the process of selling it or renting it out. A real estate agent can help you evaluate your options based on current market conditions. He or she can also give you an idea of how much equity you have in your current home so you know how much you can afford to spend on your new one.
Your agent can also advise you on how to time your sale and purchase. While some buyers are able to qualify for and cover the costs of two concurrent mortgages, many are not. There are a number of options available, and a skilled agent can help you determine the best course given your circumstances.
We would love to assist you if you have plans to buy or sell a home in our area. Please contact us to schedule a free consultation so we can discuss your unique needs and devise a custom plan to make your relocation as seamless as possible. If you’re relocating outside of our area, we can help you find a trusted agent in your new city.
4. Prepare for Your Departure
While everyone considers packing a fundamental part of moving, we often overlook the emotional preparation that needs to take place. If you have children, this can be especially important. Communicate the move in an age-appropriate way, and if possible take them on a tour of your new home and neighborhood. This can alleviate some of the mystery and apprehension around the move.4
Allow yourself plenty of time to pack up your belongings. Before you start, gather supplies, including boxes, tape, tissue paper and bubble wrap. Begin with non-essentials—such as off-season clothes or holiday decorations—and sort items into four categories: take, trash, sell and donate/give away.5
To make the unpacking process easier, be sure to label the top and sides of boxes with helpful information, including contents, room, and any special instructions. Keep a master inventory list so you can refer back to it if something goes missing.
If you will be using a moving company, start researching and pricing your options. To ensure an accurate estimate of your final cost, it’s best to have them conduct an in-person walkthrough. Make sure you’re working with a reputable company, and avoid paying a large deposit before your belongings are delivered.6
If you plan to drive to your new home, map out the route. And, if necessary, make arrangements for overnight accommodations along the way. If driving is not a good option, you may need to have your vehicles transported and make travel arrangements for you, your family and your pets.
Lastly, if you will be leaving friends or family behind, schedule final get-togethers before your departure. The last days before moving can be incredibly hectic, so make sure you block off some time in advance for proper goodbyes.
Looking for a reputable moving company? We are happy to provide referrals, as well as recommendations on where to procure packing supplies in our area.
5. Prepare for Your Arrival
To make your transition go smoothly, prepare for your arrival well before moving day. Depending on how long your belongings will take to arrive, you may need to arrange for temporary hotel accommodations. If you plan to move in directly, pack an “essentials box” with everything you’ll need for the first couple of nights in your new home, such as toiletries, toilet paper, towels, linens, pajamas, cell phone chargers, snacks, pet food and a change of clothes.7 This will keep you from searching through boxes after an exhausting day of moving.
Arrange in advance for your utilities to be turned on, especially essentials like water, electricity and gas. (And while you’re at it, schedule a shut-off date for your current utilities.) Update your address on all accounts and subscriptions and arrange to have your mail forwarded through the postal service. If you have children, register them for their new school or daycare and arrange for the transfer of any necessary records.
You may want to have the house professionally cleaned before moving in. And if you plan to remodel, paint or install new flooring, it’s easier to have it done before you bring in all of your belongings.8 However, it’s not always feasible without someone you trust locally who can supervise. Another option is to keep a portion of your things in storage while you complete some of these projects.
If there are no window treatments, you may need to install some (or at least put up temporary privacy film), especially in bedrooms and bathrooms. And if appliances are missing, consider purchasing them ahead of time and arranging for delivery and installation shortly after you arrive. Just be sure to check measurements and installation instructions carefully so you aren’t stuck with an appliance that doesn’t fit or that requires costly modifications to your new home.
If you own a car, check the requirements for a driver’s license and vehicle registration in your new area and contact your insurance company to update your policy.8 If you will rely on public transportation, research options and schedules.
If you’re relocating to our area, we can help! We offer “VIP Relocation Assistance” to all of our buyer clients. Contact us for a list of preferred hotels, utility providers, housekeepers, contractors and more!
6. Get Settled In Your New Home
While staring at an endless pile of boxes can feel daunting, you should take advantage of this opportunity to make a fresh start. By creating a plan ahead of time, you can ensure your new house is thoughtfully laid out and well organized.
If you followed our suggestion to pack an “essentials box” (see Step 5), you should have easy access to everything you’ll need to get you through the first couple of nights in your new home. This will allow you some breathing room to unpack your remaining items in a deliberate manner, instead of rushing through the process.7
If you have young children, consider unpacking their rooms first. Seeing their familiar items can help them establish a sense of comfort and normalcy during a confusing time. Then move on to any items you use on a daily basis.10
Pets can also get overwhelmed by a new, unfamiliar space. Let them adjust to a single room first, which should include their favorite toys, treats, food and water bowl, and a litter box for cats. Once they seem comfortable, you can gradually introduce them to other rooms in the home.11
As you unpack, make a list of items that need to be purchased so you’re not making multiple trips to the store. Also, start a list of needed repairs and installations. If you have a home warranty, find out what’s covered and the process for filing a service order.
Although you may be eager to get everything unpacked, it’s important to take occasional breaks. Have some fun, relax and explore your new hometown!
7. Get Involved In Your New Community
Studies show that moving can lead to feelings of loneliness and depression. People who have recently moved tend to be isolated socially, more stressed, and less likely to participate in exercise and hobbies. However, there are ways to combat these negative effects.12
First, get out and explore. In a 2016 study, recent movers were shown to spend less time on physical activities and more time on their computers, which has been proven to lead to feelings of depression and loneliness. Instead, get out of your house and investigate your new area. And if you travel by foot, you’ll gain the advantages of fresh air and exercise.12
Combat feelings of isolation by making an effort to meet people in your new community. Find a local interest group, take a class, join a place of worship or volunteer for a cause. Don’t wait for friends to come knocking on your door. Instead, go out and find them.
Finally, be a good neighbor. Make an effort to introduce yourself to your new neighbors, invite them over for coffee or dinner, and offer assistance when they need it. Once you’ve developed friendships and a support system within your new neighborhood, it will truly start to feel like home.
Want more ideas on how to get involved in your community? Contact us for a free copy of our report, “Welcome Home: 10 Tips to Turn Your Neighborhood Into a Hometown Haven.”
LET’S GET MOVING
While moving is never easy, these seven steps offer an action plan to get you started on your new adventure. To avoid getting overwhelmed, focus on one step at a time. And don’t hesitate to ask for help!
In a 2015 study, 61 percent of participants ranked moving at the top of their stress list, above divorce and starting a new job.13 But with a little preparation—and the right team of professionals to assist you—it is possible to have a positive relocation experience.
We specialize in assisting home buyers and sellers with a seamless and “less-stress” relocation. Along with our referral network of movers, handymen, housekeepers, decorators, contractors and other service providers, we can help take the hassle and headache out of your upcoming move. Give us a call or message us to schedule a free, no-obligation consultation!
Sources:
1. You Move Me –
https://www.youmoveme.com/us/blog/105-tips-for-a-successful-relocation
2. HouseLogic.com –
https://www.houselogic.com/buy/house-hunting/must-have-items/
3. Livestrong –
https://www.livestrong.com/article/436651-the-effects-of-sunlight-fresh-air-on-the-body/
4. Parents Magazine –
https://www.parents.com/parenting/money/buy-a-house/make-moving-easier-on-you-and-your-kids/
5. The Spruce –
https://www.thespruce.com/starting-to-pack-for-your-move-2436470
6. Moving.com –
https://www.moving.com/tips/hiring-quality-movers/
7. The Spruce –
https://www.thespruce.com/unpack-your-entire-home-2435815
8. HouseLogic.com –
https://www.houselogic.com/buy/moving-in/before-you-move/
9. HGTV –
https://www.hgtv.com/design/real-estate/moving-checklist
10. Moving.com –
https://www.moving.com/tips/how-to-unpack-and-organize-your-house/
11. ASPCA –
https://www.aspca.org/pet-care/general-pet-care/moving-your-pet
12. Psychology Today –
https://www.psychologytoday.com/us/blog/is-where-you-belong/201607/why-youre-miserable-after-move
13. The Daily Express –
https://www.express.co.uk/news/uk/574171/Divorce-stressful-moving-home
3,908 total views, 2 views today
From summer vacations to winter holidays, it seems each season offers the perfect excuse to put off our to-do list. But be careful, homeowners: neglecting your home’s maintenance could put your personal safety—and one of your largest financial investments—at serious risk.
In no time at all, small problems can lead to extensive and expensive repairs. And even if you avoid a catastrophe, those minor issues can still have a big impact. Properties that are not well maintained can lose 10 percent (or more) of their appraised value.1
The good news is, by dedicating a few hours each season to properly maintaining your home, you can ensure a safe living environment for you and your family … and actually increase the value of your home by one percent annually!1 You just need to know where and how to spend your time.
Use the following checklist as a guide to maintaining your home and lawn throughout the year. It’s applicable for all climates, so please share it with friends and family members who you think could benefit, no matter where their home is located.
Spring
After winter, many of us look forward to a fresh start in the spring and start preparing your home for warmer weather and backyard barbecues.
Inside
Outside
Summer
Summer is generally the time to relax and enjoy your home, but a little time devoted to maintenance will help ensure it looks great and runs efficiently throughout the season.
Inside
Outside
Fall
Fall ushers in another busy season of home maintenance as you prepare your home for the winter weather ahead.
Inside
Outside
Winter
While it can be tempting to ignore home maintenance issues in the winter, snow and freezing temperatures can do major damage if left untreated. Follow these steps to ensure your house survives the winter months.
Inside
Outside
While this checklist should not be considered a complete list of your home’s maintenance needs, it can serve as a general seasonal guide. Systems, structures and fixtures will need to be repaired and replaced from time-to-time, as well. The good news is, the investment you make in maintaining your home now will pay off dividends over time.
Keep a record of all your maintenance, repairs and upgrades for future reference, along with receipts. Not only will it help jog your memory, it can make a big impact on buyers when it comes time to sell your home … and potentially result in a higher selling price.
Are you looking for help with home maintenance or repairs? We have an extensive network of trusted contractors and service providers and are happy to provide referrals! Call or email us, and we can connect you with one of our preferred vendors.
Sources:
13,054 total views, 14 views today
Ensure a Good First Impression
Homebuyers make up their minds about a property in the first few minutes. Make sure your home makes that vital first impression. New paint does wonders. Make sure the front yard is flawless with manicured lawns and attractive foliage. Add a hanging basket or some flower pots at the door. The front door is also critical, make sure the hardware is presentable.
Make them Feel Welcome
Don’t forget buying a home is in many ways an emotional decision, so it’s important to give buyers that warm and fuzzy feeling! Keep the temperature in the home at a comfortable level. Light some candles in the bathrooms and make sure it smells nice and clean. Have fresh flowers around the house.
But don’t make it too personal
Make them feel welcome, but don’t go too far. Too much personality, for example in the form of personal possessions and family photos makes it hard for buyers to visualize living in the space.
Clear out the Clutter
Make sure your property is clutter-free for all your viewings. This will make your home look and feel bigger, and the buyers will be able to imagine how they could make the space their own. Make sure that there is a clean, logical flow through the home by getting rid of all excess furniture. Less is more.
Improve Lighting
This is another way to make your home seem more spacious. Open all your curtains and flood the space with natural light. Make sure the darker rooms are also lit. Invest in some light fixtures and fittings, and place them strategically to illuminate even the gloomiest of areas.
Decorate to Sell That House
Slap on a fresh coat of paint in a neutral color to give it that blank canvas look but do not be too sterile. Have some contrast in the trim as well as the ceiling. Neutral colors make properties appear lighter and brighter, so take advantage of this inexpensive and easy option. You may also add color with decorative window coverings, rugs, and towels.
Clean Up Your Act
Your home should be spotless. Make sure the beds are made and the countertops are free of clutter. The dishes should be put away and nothing should be scattered on the floor. Don’t forget to tidy your garden too: Cut the shrubs back, sweep the patio, and wipe down the backyard furniture.
Those Minor Repairs You Put Off
It is easy to forget things such as broken doorknobs, cracked tiles, holes in walls and damaged but buyers will notice them first thing as they are walking around your home.
Maximize Your Space
The golden rule of selling is to make your space look and feel bigger and better than what your competitors have to offer. We’ve already mentioned that lighting your home, both naturally and artificially, can maximize your assets, but getting rid of bulky furniture can also be a great way of making the most of what you have. Large pieces of furniture make a space feel smaller, so put these items into storage and dress your home with more compact pieces.
Don’t Forget Your Floors
Make the investment of improving and investing in those floors. Worn carpets and damaged vinyl floors need to be replaced, and wooden floors especially should undergo some maintenance. This is not chap by any means, but the prospect of selling your home for the best possible price will likely outweigh the cost.
Remove Pets During Showings
You do not need to remind the potential buyer that the previous owner kept pets.
Try to remove your pets from your home when you are showing the home. Having a pet in the house or yard can create complications for your agent while trying to show the house, and puts your pet at risk of accidentally getting out during the showing. There are also liability issues to deal with as well. They may react differently to stranger and it may cause them stress. All pet-related damage should be repaired prior to showing the home. Make sure to also remove all odors and stains. New visitors will notice smells when they come to view the house. This is not something you want to happen. Have your carpet and floors professionally cleaned or replaced. Pick up any messes in the backyard and have any sod replaced and other damage repaired.
945 total views, no views today